“I hope to finish it this summer!” I said with optimism back in January. (After having worked on it in September 2017 and putting it aside…)
Instead, here comes autumn, and this post will be about finishing the waistcoat and starting the frock coat buttons.
(As a reminder: this is not historically accurate – I am reproducing the court suit that Prince Adam wears in the last scene of the the new Beauty and the Beast movie! I do comment on accuracy at various points, though.)
Part I (breeches, binder, & shirt)
Part II (waistcoat & buttons)
Part III (frock coat &c.)
Waistcoat
I scheduled a sewing day with a friend and only brought the waistcoat, in order to force myself to get back to it. Success! I started off with something fun: splitting the back up the center halfway and adding lacing. I felt pretty confident about doing this because I’d practiced on a waistcoat I bought off someone a few weeks ago, haha.


I pinned the sides, cut straight up the center, and then turned my edges under and slipstitched the lining to the top. Went back to my pinterest board and determined that these were spiral laced; got out my awl and went to work. A pretty quick process, all around. I probably could have gone a bit higher with the slit, but this works just fine.
I finally got around to hemming the thing after that (also an easy step that I should have just owned up to a year ago)…and was finally ready to tackle the buttonholes.
Of course, that’s when I realized that I needed to apply the lace pieces before sewing the buttonholes….sigh.
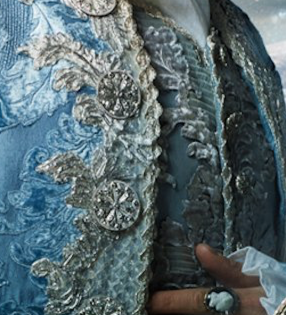
So, the lace. I pulled out what I had bought last year, went “eh….whatever”, sliced them in half, and went to work pinning. The applique on the original costume widens out at the chest, comes back in at the waist, and widens out again at the bottom hem, and I think I managed to get somewhere close with the pieces that I bought. They’re not nearly as high-quality, but I wasn’t going to spend thousands of dollars on lace, so… (Let’s be real: if I was going to that effort, this would be embroidered!) It still bothers me that they resorted to lace rather than anything accurate. I would like to ‘clean up’ the edges of my lace by bordering it with seed beads, though – we’ll see if that gets done at some point.


 This process was just careful pinning and then lots of tacking stitches around the edges. (I wasn’t very careful with the opening edges because they’ll get covered and secured when I sew on trim later.) I had to go through the lining with my sewing because the silk is so light – it makes me wish I’d flatlined, or gone with another fabric. Ah, well.
Despite my dislike of plain lace applique on garments (it reads as cheap and easy to me), I actually didn’t hate this once it was done. Excellent! On to buttonholes.
Buttoning up…

Weirdly enough, I think the buttonholes were my biggest mental block about this costume? My levels of fear and annoyance were just that high. Which is ridiculous, because I normally don’t mind them!
I think that perhaps the experience of making all of this out of silk habotai, which is very light and slippery, compounded my fear of failure. In the end, the parts of the buttonholes on the silk and cotton proved to be very easy (and nice and neat); it was the lace that was the problem! It was so uneven and bumpy that it resulted in crappy looking stitches. (Closeup below.) Fortunately, the thread I used blends in pretty nicely, so it’s not obvious from more than a foot away. Probably.

I did the buttonholes on the breeches out of DMC embroidery thread, and then switched to cotton twist for the waistcoat. I’m so glad I did; it may be thinner, but it was a dream to work with in comparison. I just wish they made it in more colors!
That done, I could finally try it on properly! I realize that I never tried the waistcoat and breeches on together – it’s nice to see that the awful awkward cameltoe/diaper effect is covered, haha. And I’m very glad that I added the lacing at the back of the waistcoat – it was necessary.

Seeing myself in everything and realizing that the overall effect is so cohesive is really nice – it gave me a real confidence boost!
 Now, a note on the trim: The edging on both his waistcoat and frock coat is the same, and it’s an interesting sort of double helix shape. I couldn’t for the life of me find anything remotely similar! It’s possible that they made it out of twisting a double-edged cord, but unfortunately I couldn’t find anything good for that either. In the end, I found some trim that sort of feels right, even if it doesn’t look the same at all – it’s twisty and silver, and doesn’t look like I bought it in Jo-Ann’s. Hah. I will likely also use two different trims for the two garments; there’s no one trim that I liked enough to use it on both and be satisfied.
Frock coat buttons!
Five Colleges & Historic Deerfield, HD F.075 – Waistcoat, 1725-50
Before I undertook excavating my previously-cut pieces, I decided to follow up on my idea of Dorset buttons. Since my initial research, I’ve seen a few 18th century garments with the small wheel buttons, so I feel a bit better about using them.
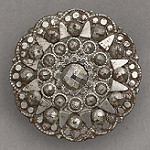
c.1800 Birmingham 1887 F904.7
Additionally, the closest type of metal buttons that I could find were just not doing it for me (and they weren’t very cheap, either). From what I can find, the closest solid match are cut steel buttons, which date a bit later, or rhinestones on metal, which are late Victorian.
So: thread. (The cotton twist again.)

The first attempt ended up pretty wonky and took about an hour, but it was satisfying! I didn’t particularly want to make 30+ though, and the plainness of the cotton twist wasn’t doing it for me either.
So I had another go, this time with beads – and I think it’s much closer to the spirit of his metal buttons. There’s a flowery detail, some sparkle – these will do! And any wonkiness is more easily hidden. They’re less satisfying than the full thread versions, but they’re also much faster. I can do them in about 30 minutes, including covering the base, and that will hopefully get better with practice. So…only 17 hours on buttons, instead of 34! Hah.

I think I may try a couple with eight spokes, instead of only six – if they work out, then those will be for the front of his coat, and I’ll scatter the rest of these around the cuffs and back, etc. I need more beads, though!
Thanks for reading, and I’ll see you later for…
Part III – Frock Coat & Finishing

Pingback: 1740-60s Court Suit (Part I) | Sewing with Kenna
Pingback: 1740s-60s Court Suit (Part III) | Sewing with Kenna